Sunday 26 May 2013

Extension week 1

We have finally started the extension.  Week one is over and we've already encountered two pretty major problems... but I'll start at the beginning.

The first picture is of the house from the back before we started the work.


First we sold the conservatory.  That was a task in itself as the first buyers on eBay went AWOL and then pulled out.  But we found some better buyers and they even took it down themselves. 


Monday the electrician removed all the electrics in the single storey part of the kitchen that was to be knocked down.

Tuesday the groundworkers started, but uncovered a wooden lintel at the back of the original house that was proped up by, well, air! New steel to be put in - watch this space.  Then we discovered the quarry ties in the back room were laid on earth and were sinking.  So up come the tiles and next week down goes some more concrete - all eating into our contingency fund!

By the end of week one we have foundations in


Saturday 9 February 2013

Border Oak

In this month's issue of Home Building Renovating magazine there is an article about a gorgeous oak framed house.  I have always loved these sorts of houses so I thought I'd do a little blogging about one of my favourite oak framers - Border Oak.


They have all sorts of different types of designs, farmhouses, barns, cottages, manor houses, outbuildings, single storey and extensions. 


A key feature of some of the designs is the brick chimney, which I in particular would definitely want including in any oak framed house we have!


If you go to their website http://www.borderoak.com you will be able to see floor plans, photos and lots of info.  They have a facebook page too :)

Tuesday 22 January 2013

Dissertation!

Well this blog isn't quite about property and interiors in the usual sense, this is all about my husband Tom's dissertation.  He is focusing on timber frame eco/green self builds and needs some very nice people to answer some questions.  Whether they are in the business or have built their own houses I don't think it matters, but the more info he can gather the better!

So I'm trying to help. I've just been bombarding people on Twitter asking if they know of anyone that would be happy to answer questions, so thought I'd just summarise here what exactly it is that he wants so that I can point all you helpful people here:

Aim: To assess why people in Britain choose to build using timber frame for a green/sustainable/eco self build

Sub questions:

What are the positives and negatives for building in timber frame?

Why do people choose to self build?

Why do people choose to build eco/green houses?

If anyone has any info that they think might help, please email tpw1blt@bolton.ac.uk 

Thanks all! :)

Friday 18 January 2013


Designing an extension


So we are now onto a new project - our detached 1930s 2 bed house. This is the front elevation and we're not changing this apart from hopefully replacing the windows to be white aluminium (as the glazed areas will be bigger and therefore the rooms inside will get more light) and the front door will be replaced with something more inkeeping with the syle of the house. The neighbouring houses all have wooden stained glass doors so the plan is to do something similar. Watch this space for door ideas!


This is the back elevation of the house. As you can see there is a mish-mash of single storey extensions. One being a small addition to the kitchen, and the other a large conservatory.  The only reason we bought the house was because this conservatory would house our very large oak dining table, however the conservatory has to go as the roof is leaking and the floors are sloping.  These two extensions will be removed to make way for a two storey extension, which will consist of extra bedroom space on the first floor and an open plan kitchen diner on the ground floor with doors to the garden.


This is the existing floor plan. we currently have two double bedrooms upstairs, but bedroom two will be reduced in size to create a corridor into the new extension. The main bedroom and bathroom will remain the same size.  The bathroom however will be replaced as the suite is cream and very old!


This is the proposed floor plan.  There is an extra ensuite upstairs to the new master bedroom.  We plan to get everything matching for the bathrooms to save on cost. 


We thought long and hard about the layout of the upstairs. We have decided to go with this layout due the roof structure.  We will end up with a double peak roof at the rear of the house and the valley in between will meet at the top of the partition between the master bedroom and the small bedroom/ensuite.


This is the proposed rear elevation, which shows the double peak.  We also plan to have large double doors from the kitchen out onto the garden (we can't decide between sliding doors and french doors! I think it will come down to the cost!) 

The planning drawings are all finished now, so wish us luck with our application, hopefully we will be submitting it any day now :) 


Wednesday 26 September 2012

Lounge diner


The front of the house downstairs was made up of a lounge and a dining room, each room seemed a bit small so we decided to knock through the wall between them. First we had to strip all the horrible layers of wallpaper (on the walls and ceiling!) and pull out the carpets.  We also blocked up one of the doors and and replaced the door left with one with glazing to allow light into the hallway.  We decided to lay solid oak in the hallway and lounge diner for a sense of continuity, plus it is hardwearing and  according the B&Q if we wanted to we could re-sand and re-varnish it. 

We removed the old gas fireplace as the back boiler was behind it and it needed removing. We bought a new electric fireplace to replace it with but it hindsight we probably paid too much for it and should have gone with something that gave out a bit more heat!

Luckily both the dining room and the lounge had large tip and tilt windows, so we could get our very large oak dining table in and out! We bought bookcases from Ikea to put in the dining end of the open plan room as we have a large book collection plus a lot of stuff. As we'd knocked through we'd gained a lot of space so the bookcases didn't enclose the room at all. We had dimmers installed for the two light fittings.  Rick installed new skirtings all the way round to hold down the wooden floor (he also fitted the wooden floor - thanks Rick!) which we painted white and the walls we painted in a light creamy colour. 

The main problem we had with this room was when we took off the wall paper off the ceiling and part of the ceiling came down.  The whole ceiling was lath and plaster so rather than redoing the whole lot we had that small section patched with plaster board.  

Another slight problem we had was finding a structural engineer for the lintel where we knocked through the two rooms. We found a local guy who did some calculations for us but when we gave them to our builder he said that the system that had been drawn was not the normal system of pad stones and a thick steel lintel, but thin steels along the wall and across the ceiling - very odd.  Needless to say we had to find a structural engineer to do some proper calculations and pay again for the privilege.  We know now to go by recommendation for this sort of thing and to specify exactly what we want.

So tips you can take from this - go by recommendation and always be clear what your requirements are.

Also in hindsight I would have probably chosen some better light fittings as the bulbs in the ones we chose kept blowing. Perhaps some energy efficient fittings and bulbs would have been better!


Wednesday 12 September 2012

Bathrooms


In our first project the main bathroom suite was grey, and very old. The shower was electric and a trickle! The bath seemed to fill up incredibly quickly when having a shower and when we finally had the bathroom redone, it turned out the drain pipe was angled upwards - not good at all.

There were tiles all over the walls, and when we tried to take those down, all the old plaster fell of the walls.  Therefore we had to replaster the whole room. Whilst doing that we decided to take out the old airing cupboard that had housed the hot water tank (which was no longer needed as we'd just put a new combi boiler in the utility room).  We got the plumber to build a shelf in place of the cupboard which was above the stairs and hence had to be quite high due to the angle of the stairs.  

We had a lovely big double ended bath put in, with an extra big bath screen. Separate taps and power shower, and white suite. The tiles were from Wickes £5.99 a pack, but once tiled, together with the quality fittings they didn't look cheap. I think if you combined cheaper tiles but quality fittings, it doesn't look cheap. 

Overall the plumbers did a really good job, however we did have a few problems with the timescales. He said that it would only take 2 weeks, but actually took twice that time. The main plumber we engaged with kept disappearing off the job and left his mate behind. We did some research and the Corgi membership belonged to the mate rather than the man we'd employed!  One evening we rang him to ask when he would actually be finished, and he didn't answer. We went off to have showers at my father in laws house (as we were obviously without a bathroom!) and when we came back we had over 20 miss calls off him, plus a very irate voice mail.  Once he finished the job we have not used him again, and have instead discovered a very good plumber in our friend Annie's dad. He has already installed a new boiler in our current house and just popped in whilst I was writing this to look at a leaking tap - very good service :)

Wednesday 5 September 2012

Property and Interiors - first project


This is the house that was our first project. The first this we did was dig up the front garden and have a driveway put in. The garden at the back was plenty and a driveway was essential as the house was on a busy main road. 

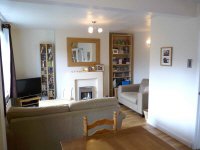
The house hadn't been touched in a long while so we had great fun pulling down the wall paper, knocking walls down and revamping the whole place. 

We had grand plans initially involving a two storey extension at the back, but in the end decided against this as the house didn't warrant it. We did a straight forward refurbishment:

  • Knocked through the lounge and dining room
  • Knocked down a very badly positioned wall to open up the kitchen
  • Knocked through into an outhouse to create a utility and WC
  • New kitchen
  • New bathroom
  • All new decor and flooring throughout
  • Painting the external render. 
The outside of the house looks so much better now! 

The old kitchen units were extremely difficult to remove, my husband reckons they were welded on. 

We must have lived without a kitchen (including a kitchen sink) for about 4 weeks. We had all new electrics and wiring installed, a new boiler was installed in the utility which was off the kitchen (as previously it was in the chimney breast - not what we wanted), so a lot had to be done before the new units and appliances could go in. We designed the new cabinet layout and went to a few different suppliers to see who could do the best deal. Our friend Rick is a joiner and in the end we asked him to install the kitchen and he purchased it from Howdens at a reduced price.

We specifically wanted a double oven so that we could cook one thing whilst using the grill. 

We would have preferred a double sink, but as we wanted a dishwasher as well it wouldn't fit.

The units were really sturdy, and really easy to clean. The work surface was a laminate, but looked like wood. The floor and wall tiles were from B&Q, and  were a bit difficult to lay as they had curved corners! I did try to help with the wall tiles but the floor was all Rick's doing.