 The front of the house downstairs was made up of a lounge and a dining room, each room seemed a bit small so we decided to knock through the wall between them. First we had to strip all the horrible layers of wallpaper (on the walls and ceiling!) and pull out the carpets. We also blocked up one of the doors and and replaced the door left with one with glazing to allow light into the hallway. We decided to lay solid oak in the hallway and lounge diner for a sense of continuity, plus it is hardwearing and according the B&Q if we wanted to we could re-sand and re-varnish it.
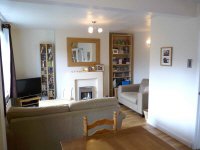
We removed the old gas fireplace as the back boiler was behind it and it needed removing. We bought a new electric fireplace to replace it with but it hindsight we probably paid too much for it and should have gone with something that gave out a bit more heat!
Luckily both the dining room and the lounge had large tip and tilt windows, so we could get our very large oak dining table in and out! We bought bookcases from Ikea to put in the dining end of the open plan room as we have a large book collection plus a lot of stuff. As we'd knocked through we'd gained a lot of space so the bookcases didn't enclose the room at all. We had dimmers installed for the two light fittings. Rick installed new skirtings all the way round to hold down the wooden floor (he also fitted the wooden floor - thanks Rick!) which we painted white and the walls we painted in a light creamy colour.
 The main problem we had with this room was when we took off the wall paper off the ceiling and part of the ceiling came down. The whole ceiling was lath and plaster so rather than redoing the whole lot we had that small section patched with plaster board.
Another slight problem we had was finding a structural engineer for the lintel where we knocked through the two rooms. We found a local guy who did some calculations for us but when we gave them to our builder he said that the system that had been drawn was not the normal system of pad stones and a thick steel lintel, but thin steels along the wall and across the ceiling - very odd. Needless to say we had to find a structural engineer to do some proper calculations and pay again for the privilege. We know now to go by recommendation for this sort of thing and to specify exactly what we want.

So tips you can take from this - go by recommendation and always be clear what your requirements are.
Also in hindsight I would have probably chosen some better light fittings as the bulbs in the ones we chose kept blowing. Perhaps some energy efficient fittings and bulbs would have been better!


